Showing posts with label jewelry how-to. Show all posts

Tuesday, April 12, 2011

Labyrinth Inspired Masquerade Ball Earrings

I loved Labyrinth as a child. From the friendships to the adventure to (in my teens) David Bowie, the entire movie was totally enchanting! I re-watched it recently and was struck by the gremlin ball scene, especially Sarah's ballgown and hairpiece. It's a combination of silver ribbons and leaves cascading down with her hair.


I was inspired to make a pair of earrings that would give a similar effect as her hair accessory for the Craftster Jewelry and Trinkets Challenge 3. 


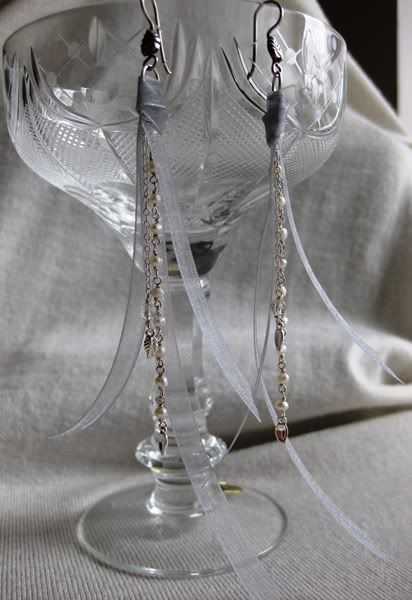
They'd be a great addition to a Halloween costume as Sarah, a fairy, and even a mermaid! If you want to make a pair for yourself, here's a quick tutorial:

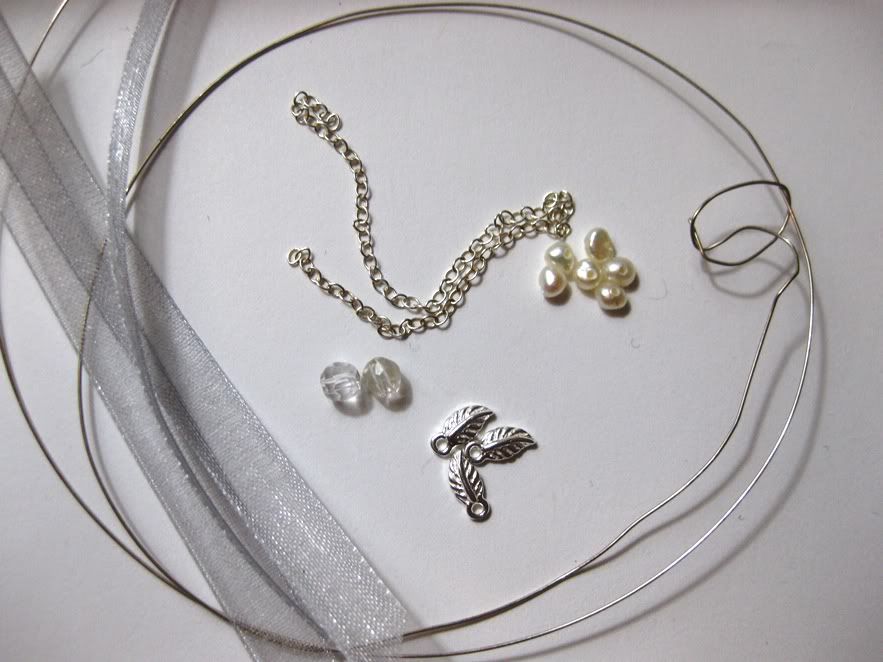
Materials: Silver organza ribbon (0.5 to 1 cm wide), silver chain, silver wire, small round pearls, 2 faceted rock quartz round beads, 4 silver leaves, 2 silver jump rings, silver earwires, scissors, needle, light gray thread, round nose pliers, flat nose pliers, cutters.

Try to get a roll of organza ribbon. This will ensure that your ribbon is gently curled.

The following instructions are for one earring. Repeat to get a pair.

  • Cut three lengths of ribbon: 14 cm, 11.5 cm, and 8.5 cm. Cut the bottoms so that they come to a point. 
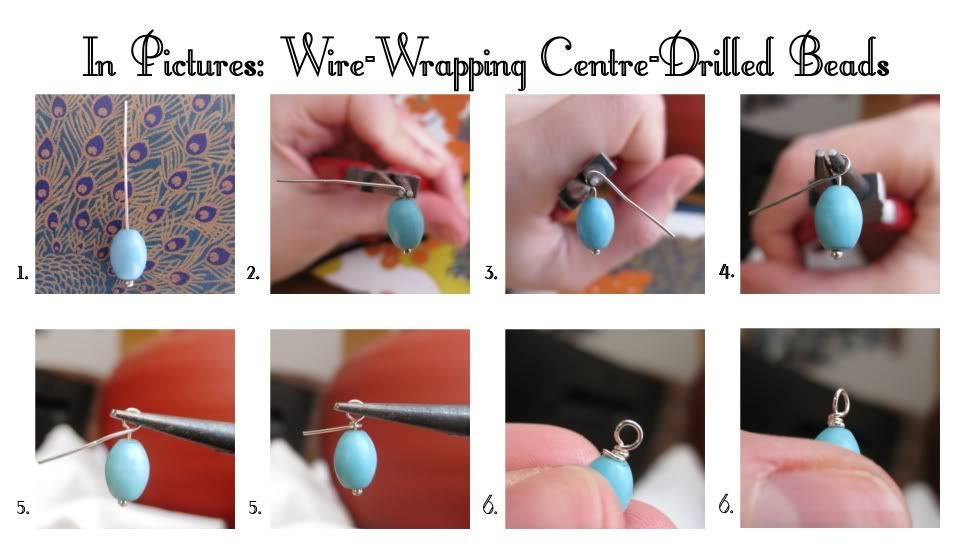
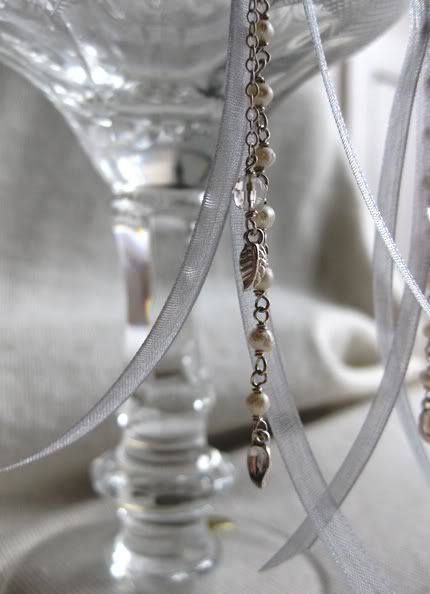
  • Create a chain of pearls 7 cm long by wire-wrapping 10 pearls together. See Jewelry Design 101: Wire-Wrapping Part 1 for instructions. Instead of starting with a ballpin, create a wrapped loop with a short length of wire, insert a pearl, and create another wrapped loop. Repeat with another pearl, but before closing the second wrapped loop, insert a loop from the first pearl you wrapped. Continue with the remaining 8 pearls. Before closing the second wrapped loop of the 8th pearl, insert a silver leaf.
  • Attach a wire-wrapped faceted rock quartz round and silver leaf to a 4 cm length of silver chain.
  • Layer the organza ribbons so that the longest and the shortest pieces curve in one direction and the medium piece curves in the opposite direction. Sew the three pieces of ribbon together along the top. 
  • Insert the pearl chain and the silver chain between the short and medium organza pieces. Sew them in place.

  • Sew a jump ring to the top of the organza ribbon cluster so that half if it peeks over the top. 
  • Sew another piece of ribbon perpendicular to the top of the organza ribbon cluster. Wrap it around the organza ribbon cluster a few times to cover up any visible stitches and the bottom half of the jump ring. Tuck the end in and secure it in place by sewing it down. 
  • Insert the jump ring through an ear wire.

Friday, March 25, 2011

Jewelry Design 101: Wire-Wrapping Pt. 2

Wire-wrapping top-drilled beads is slightly more complex than wire-wrapping centre-drilled beads, but with a little practice, you're certain to pick it up quickly!

You will need: beads, wire, round-nose pliers, flat-nose pliers, and cutting pliers. I suggest that beginners use craft wire to practice. Please see Jewelry Design 101: Wire-Wrapping Pt. 1 for a description of the different pliers used and the difference between centre and top-drilled beads.

How to Wire-Wrap Top-Drilled Beads
The follow instructions apply for a bead 0.7 mm wide and 1.1 cm long. You should use a longer piece of wire for larger beads.
  1. Insert a 6 cm piece of wire into the bead hole so that circa 1 cm of wire comes out of one end. This end will be the 'short end'.
  2. Bend the short end up flush with the side of the bead.
  3. Bend the long end up flush with the side of the bead.
  4. Using flat nose pliers, straighten the long end of the wire. The two wire ends should overlap.
  5. Grip the bead with your fingers and twist the short end of the wire around the long end of the wire once or twice.
  6. Trim any excess of the short wire with the cutters and tuck in the end with the flat nose pliers.
  7. Grasp wire with round-nose pliers (pliers should be flush with the top of wrap you just completed). Bend wire at a 90 degree angle. 
  8. Reposition pliers and grasp the wire just past the bend. With your fingers, wrap the wire around the round jaw of the pliers to create a loop.
  9. Reposition pliers and continue wrapping wire around the pliers until you form a complete loop. *At this point, you may choose to insert another looped wire, or a chain link into the loop before closing it. This is optional.
  10. Grasp the loop with the round-nose pliers and use your fingers to wrap the wire around the base of the loop at least 2 to 3 times. You may choose to continue wrapping the wire until it overlaps the top of the bead.
  11. Using your cutting pliers, cut the excess wire flush with the bead. Tuck in the end of the wire with the flat-nose pliers.
Varriations


You may choose to wrap the wire around the tip of the bead (as described in the instructions), wrap only to the tip of the bead, or thread small beads onto the wire as you wrap.

Saturday, March 5, 2011

Jewelry Design 101: Wire-Wrapping Pt. 1

Mastering the skill of wire-wrapping is essential for every budding jewelry designer. In this first installment, I will go through the basics, describing materials and tools, and show you how to wire-wrap a centre-drilled bead.

Basics
You will need: beads, wire, headpins/ballpins, round-nose pliers, flat-nose pliers, and cutting pliers. I suggest that beginners use craft wire to practice.

From left to right: round-nose pliers, flat-nose pliers, cutters.

You will use round-nose pliers to shape round loops, flat-nose pliers to tuck in loose ends, and cutters to cut your wire.

There are two types of beads: centre-drilled and top-drilled. The positioning of the hole determines the wire-wrapping technique you will use.

In centre-drilled beads, the hole runs from top to bottom through the middle of the bead.

From left to right: elongated drop bead, coin bead, teardrop briolette, round bead, rondelle.

In top-drilled beads, the hole runs from left to right through the top of the bead.

Flat briolette.

How-To Wire-Wrap Centre-Drilled Beads

  1. Insert ballpin into bead.
  2. Grasp wire with round-nose pliers (pliers should be flush with the top of the bead). Bend wire at a 90 degree angle. 
  3. Reposition pliers and grasp the wire just past the bend. With your fingers, wrap the wire around the round jaw of the pliers to create a loop.
  4. Reposition pliers and continue wrapping wire around the pliers until you form a complete loop. *At this point, you may choose to insert another looped wire, or a chain link into the loop before closing it. This is optional.
  5. Grasp the loop with the round-nose pliers and use your fingers to wrap the wire around the base of the loop 2 to 3 times. 
  6. Using your cutting pliers, cut the excess wire flush with the bead. Tuck in the end of the wire with the flat-nose pliers.

Above is a finished product. In this case, I inserted a chandelier finding into the loop before closing it (step 4).

In the next installment, I will show you how to wire-wrap a top-drilled bead.

Wednesday, February 16, 2011

Jewelry Design 101: Craft Wire

This is the first in a series of jewelry design how-to posts. Upcoming posts will focus on jewelry models, including stacked and dangle earrings, lariats, custom findings, and more. 

Inspiration has struck and you have a dashing idea in mind. It may be a colour scheme, a shape, or a detailed vision. Your storage boxes are well stocked with beads, findings, chain, and wire. You break out your pliers and some sterling silver headpins, wrap, twist, loop and snip, only to find that your vision looked better in the dreamy recesses of your mind.

The #1 resource that will prevent you from chopping through expensive precious metal wire as you dismantle an unflattering design is coloured craft wire. It's cheap, easy to work with, and available at run-of-the-mill craft supply shops. Craft wire is made out of base metal (e.g. copper, brass) or base metal plated with precious metal. It comes in a range of gauges; the higher the gauge, the thinner the wire.


Rather than creating a ready-to-wear jewelry piece, I suggest always creating a prototype using craft wire. If a design calls for head or ball pins, either purchase base metal headpins, or curl in the end of a piece of wire with your round-nose pliers.


Using craft wire, you can make variations of the same design with different beads, or use the same beads to make different designs. For instance, I used gold craft wire to make two simple stacked earrings: one with carnelian round accent beads, and one with citrine rondelle accent beads.


Once your are satisfied with your prototype, remake it using your chosen precious metal wire. If using semiprecious stones, I don't suggest leaving the craft wire design hanging around too long as a dark circle will build up around the bead hole as the wire oxidizes.

Unless you have an unlimited stock of precious metal wire, it's also a good idea to use coloured craft wire in designs where the wire will not show or is not a feature of the design. Wire-wrapped barrettes are a good example: