


Here's how I did it (and you can too):
Materials: a wooden box, a large atlas, mod podge or another type of liquid glue, acrylic paint, liquid acrylic varnish, masking tape, paintbrushes, construction paper, scissors, ruler, pencil, craft knife, screwdriver, sandpaper.
I found the box at a Value Village. It was handmade and a little beat up, but it was a great size and I liked the varnish colour. If you purchase a box from a thrift store, check the inside and avoid boxes that have had varnish seep inside. As you can see from the third photo, there are a few dark marks around the edges that I couldn't paint over properly.
Once I had the box and knew its dimensions, I purchased an atlas from a used bookstore (BMV in Toronto). I looked for one that was in good condition, and had plenty of colourful terrain maps large enough to cover the top of my box.
Directions:
- Measure and note the box dimensions. You will need these measurements to cut out your map panels.
- Unscrew the hinge holding the top and bottom of the box together. Try to keep track of which screw went into which hole. I had the unfortunate surprise of finding that the original box craftsman used two different sized screws (and made different sized holes).
- Sand the inside of the box with medium to fine grain sandpaper. If you're covering the entire box, also sand the outside. I wanted to let some of the varnished wood peek through, so I skipped sanding the outside.
- Once the inside is clean of all wood dust, apply masking tape to the edges of the box that you don't want to paint (in my case, the exposed wood seen in the third picture). If you're going to leave some wood exposed, test a small piece by pressing down the masking tape and removing it. Some of the varnish may come off; in this case, don't press your masking tape down too much.
- Paint the inside with acrylic paint. I chose a turquoise colour to mimic the gorgeous waters of the Caribbean. Paint three coats, waiting a few hours in between each coat. Once the paint has dried thoroughly - about 24 hrs - apply a thin coat of varnish using a clean paintbrush. Your brushstrokes should be going in the same direction. Wait about 6 hours and apply another thin coat of varnish. This time, change of the direction of your brush strokes by 90 degrees. This will create a crosshatch effect and make your brushstrokes less evident. Allow the box to dry 24 hours.
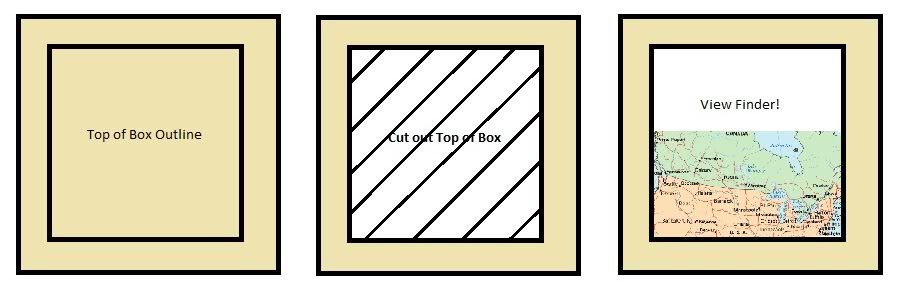
- Using the measurements from step 1, create a viewfinder for the top and sides of the box. Draw a rectangle the same size as the top of the box onto construction paper or parchment paper. Cut out the rectangle and discard. Use the remainder as a viewfinder. Repeat with the sides of the box.
- Using the viewfinders, find your preferred map images for the top and sides of the box. I chose a map of northern Canada because I'm a patriotic gal, and maps of the Caribbean, north Africa, southeast Asia and Greece because they're lovely travel destinations. Using a ruler and pencil, lightly trace out the dimensions for the top and sides of the box onto your maps and cut out the panels.
- Cover the exposed wood with masking tape. Paint a thin coat of Mod Podge onto the box and paste your panels. This should be done one panel at a time, allowing for drying time in between. Smooth down any wrinkles immediately. Once the glue has dried, apply a 2 thin coats of Mod Podge onto the panels, allowing for drying time in between. Once the glue has dried 24 hours, apply a thin coat of acrylic varnish and allow it to dry. This last step is to eliminate the tackiness of Mod Podge.
- Screw the hinge back on.
- Admire your hard work!
No comments:
Post a Comment